
First steps · 4/8
Importing Employees
You do not have to add employees one by one. Download the table, fill it in in Excel and upload it back. Before anything is saved, the system shows what it will do with each row. Only an administrator can run an import.
Where to find the import
- In Admin → Employees, under the list of employees in the dark panel on the left, there is the Import employees button.
- In a new system, the first step of the Getting started box on the main screen leads to the import too (see the “Installation Email and First Sign-In” chapter).
The Import employees page has two steps side by side: downloading the table and uploading the filled-in table.
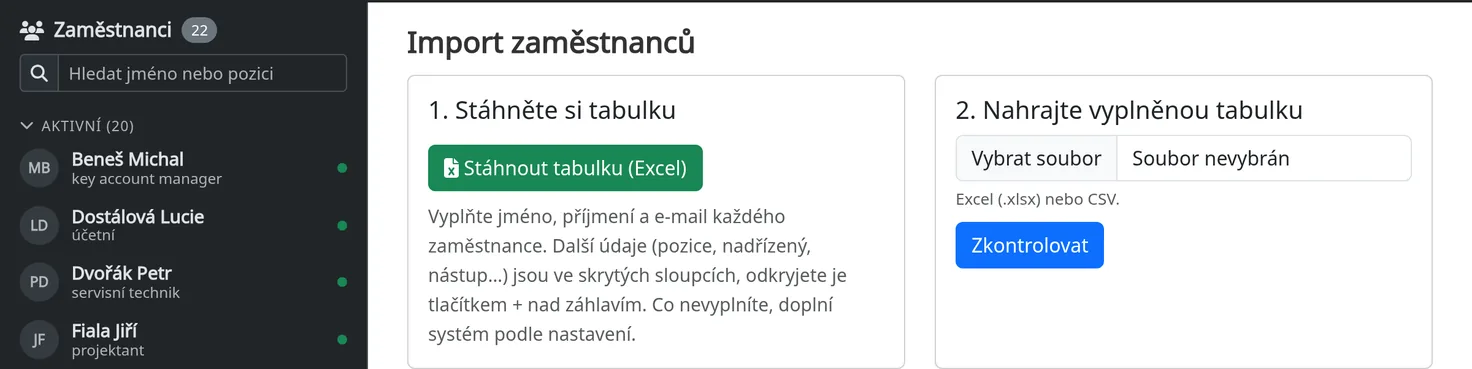
1. Download the table
Click Download the table (Excel). The file employee-import.xlsx is downloaded in the language of the system. It has two sheets.
The “Employees” sheet. One row is one employee. At first only three columns are visible: First name*, Surname* and E-mail. Only the first name and surname are required. The other columns are hidden; show them with the + button above the header:
- Title, Employee number, Position, Mobile, Note,
- Manager (first name and surname),
- Start (date) and Leaving (date),
- Working hours from, Working hours to, Break (e.g. 0:30),
- Overtime, Night shifts and Meal allowance, each with a Yes/No choice.
When you point the mouse at a column header, Excel shows a short hint. Write a date like 1. 3. 2026, a time like 8:00 and a break like 0:30. In the Yes/No columns, pick the value from the list.
Whatever you leave empty, the system fills in from the settings, just as when you add an employee individually – the working hours and the break from Admin → System.
The second row is a grey example (Jane Smith, [email protected], marked “example – overwrite”). Overwrite it or delete it. If you leave it as it is, the system skips it during the import.
Manager. Write the manager's first name and surname, or their e-mail. The manager must be in the same table or already in the system.
Leaving. An employee with a leaving date in the past is saved as a former employee.
The “Instructions” sheet. Five sentences on how to proceed. The last one shows your licence and the number of free places, for example “Your licence: up to 30 employees, 10 places free.”
Do not change the first row (the header): the system uses it to tell what is in which column. The header can be in Czech or in English. The system skips columns with any other header.
2. Upload the filled-in table
- Save the table as Excel (
.xlsx) or CSV. For a CSV, the system detects the separator and the encoding by itself. - In the Upload the filled-in table step, choose the file and click Check.
- Check before saving appears below both steps. Nothing has been saved yet.
The file may have at most 2 MB and 1000 employees. Split a larger table into several files.
Check before saving
At the top is a summary, for example “New employees: 3 · Already in the system: 1 · Errors: 1”. Former employees count as new. Below the summary is a table with the columns Row (the row number in Excel), Name, E-mail, Status and What to do.
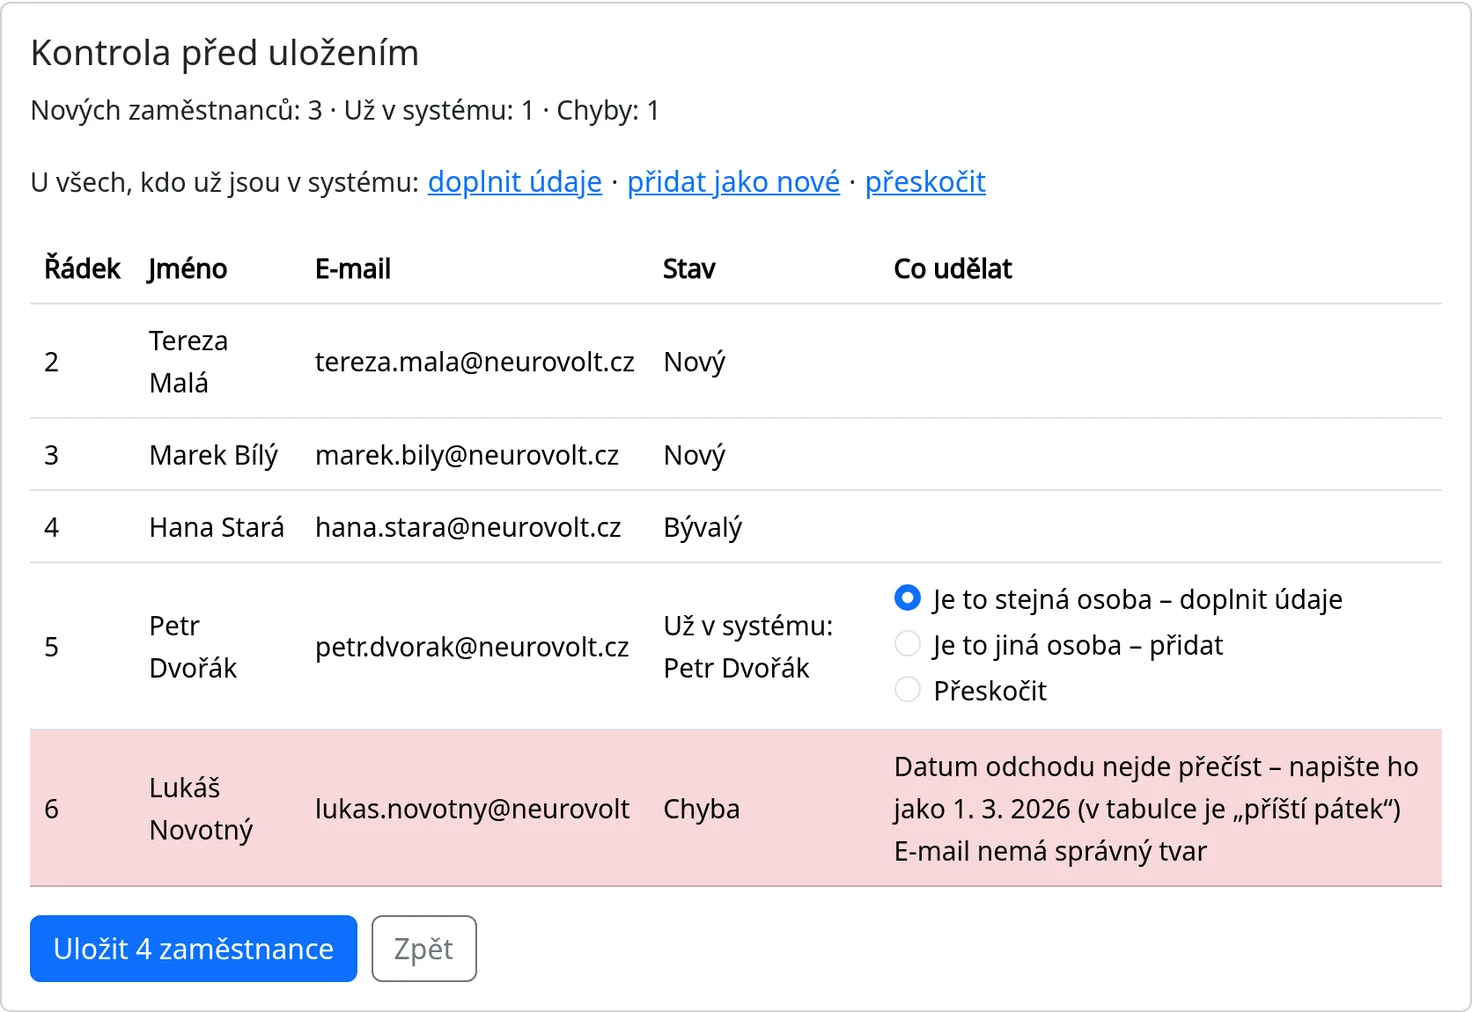
Each row has one of four statuses:
-
New. The employee is added as active.
-
Former. The leaving date is in the past. The employee is added as a former one and takes no place in the licence.
-
Already in the system: name. The system already has this person. It recognized them by e-mail; when the e-mail is missing or belongs to nobody, by first name and surname (upper and lower case and diacritics do not matter). Former employees are matched too, the kiosk at the entrance never. Choose what should happen:
- The same person – complete the details. The default choice. Filled-in cells overwrite the details in the system, empty ones change nothing. If the system recognized the person by name, the name stays as it is stored.
- A different person – add. A new employee with the same name is added.
- Skip. The row is not saved.
The line “For everyone already in the system: complete the details · add as new · skip” above the table sets the choice for all these rows with one click.
-
Error. A red row. The What to do column says what to fix, for example “The e-mail is not a valid address” or “The leaving date cannot be read – write it like 1. 3. 2026 (the table says “next Friday”)”. A missing first name or surname is an error too, as is the same employee twice in the table, two people of the same name in the system with a row without an e-mail, or a manager the system cannot find. A row with an error is not saved. Fix it in Excel and upload the table again, or save the other rows and add this employee later.
When the employees do not fit the licence
When the table has more new active employees than the licence has free places, a red box appears above the table, for example: “Your licence allows 30 active employees, the table has 2 more. Change the licence or shorten the table.” The Price list link opens the price list on attendees.eu.
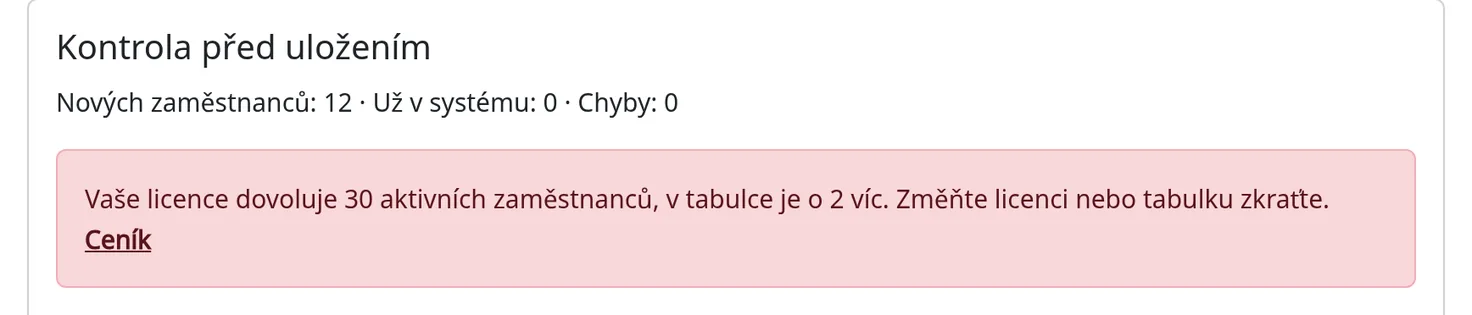
While the box is shown, you cannot save. Shorten the table and upload it again, or change the licence (see the “Administration” chapter, section Changing the licence). Former employees do not count towards the licence.
Saving
- Go through the statuses and, for the rows already in the system, the chosen option.
- Click Save 4 employees. The number on the button is the number of rows that will be saved; rows with an error do not count.
- The system takes you back to Admin → Employees and shows at the top what it did.

Skipped rows are those with the Skip choice and those with an error. Either everything is saved or nothing: when anything fails, no employee changes.
The check before saving lasts 30 minutes. After that the system says “Upload the table again.” A new upload always replaces the previous check.
What the import does not do
- It sets no password and sends no e-mail. An employee who has no login name yet gets the e-mail from the table as their login, unless someone else already uses it as a login. Send them a password with the button with the refresh and envelope icons in their profile (see the “Employees” chapter, section Generated password by email).
- It makes nobody an administrator. You set administrators on the Employment tab.
- It assigns no chip. See the “Chips” chapter.
Common problems
- “Upload an Excel (.xlsx) or CSV file.” The file has another extension, for example
.xlsor.ods. Save it as.xlsxor CSV. - “The table has no First name and Surname columns.” The header in the first row has been changed. Download the table again and leave the first row as it is.
- “The file cannot be read.” Save it again as Excel (
.xlsx) or CSV and upload it once more. - A date or time cannot be read. Excel in another language sometimes does not recognize a date. Write it as text in the form
1. 3. 2026; the system reads that.